Wednesday 16 April 2008

Importing Flash video

I had a few problems trying to import a video into flash, i first tried to link it normally, but then realised you needed to have the video aswell.

incidently, the video was taken from a dvd of friends, resized and compressed to a suitable size (approx 4MB)

I then decided to upload it to a web server, and with help from one of my old school friends who operates a web host business, uploaded the file to his web server, and then link this to my flash.

I found out that this actually worked easily enough aswell, which i was pleased at (big thanks to my mate!)

heres a print screen of the video working:

Creating the Website

To be honest, i didnt realise how easy it was to create a website in flash, i had to create 4 layers :- content, actions, background and buttons.

I then worked on the first page, and decided to keep the same fonts and backgrounds as the introduction, so that the actual transition to the website is very smooth..


I added 6 buttons to my website, as this was required in the brief. These were:-
home, episode guide (i decided to choose this instead of the A-Z listing), Latest Clip, CAtegories, contact and Upgrade flash plugin (this linked to the adobe page to update flash).

The 3 pages i decided to link together and complete were home, latest clip and episode guide.


Creating the Splash

For the 10-20 second splash, i decided to create like a introdution to the characters in F.R.I.E.N.D.S, with their characters names, and their real life names.

For this i had to download a different picture of each character and manipulate this in photoshop beforehand, and place behind a polaroid template, as i thought a polaroid fit in well with the overall design of the movie.

I used the wipe and fade transistion effects for each photo to make it more interesting, and make the name appear near the end of the transition

I also got a copy of the rembrants- ill be there for you, and shortened the clip and imported into my splash, so now you can hear the theme tune aswell


Creating the Preloader

Creating the Preloader was fairly simple, i decided to use the same layout and fonts as i was to use on the website to keep everything the same, and so make the whole flash file look proffessional.


This is the code snippet i used, to make my preloader work correctly

myLoaded = Math.round(getBytesLoaded());
myTotal = Math.round(getBytesTotal());
myPercent = myLoaded/myTotal;
myBar._width = myPercent*150;
myText = Math.round(myPercent*100)+"%";
if (myLoaded == myTotal) {
gotoAndStop(3);
} else {
gotoAndPlay(1);
}


Tuesday 15 April 2008

CMP1014 Assignment 3- IPTV Website

My initial idea for this assignment was to do a 24 themed website, as my last assignment was 24 themed although i soon scrapped this idea as it was turning out more difficult to get hold of video clips and pictures to use for the website.

My Next idea which was my final idea was to do the same thing, but with a F.R.I.E.N.D.S theme, as i have recently been watching each series (gone from 1 to 6!!!)

I was able to get pictures off the internet easily enough, and i could also get a few video clips.

Monday 7 January 2008

Exporting to a suitable format

I found that the labs computers and the AR0107 lecture theatre could play videos encoded with the WMV format, as all the computers are run on windows, so i decided to use this format.

THe video itself was 640x480 pixels, so for the smaller one, i simply halved this and encoded it with the same properties, although i had to change the frame rate to 15fps to enable playback from a CD.

Here is a screenshot of the properties i used to export the videos into a wmv file:-


Creating and addingTitles.

To create my title, i used adobes title creator included with premiere.

I actually found it easy to use, and was done within 2 minutes.

I created a black background, and in front of it, added my name, my enrolment number and the name of the video. I then changed the property so that it would scroll up from the bottom, and was pleased with the result:-


Adding sound

Adding sound was also easy to do, as i found a clip of the "24" clock tick on the internet from a friend, and luickily it was exactly 10 seconds long.


i had to import this again, and then add it to audio track one, line it up with the video track and play it to test it was all lined up correctly, and it was...result!


Adding the clock into my video

Adding the clock was fairly straightforward.

I imported each psd file into premiere and added them to the timeline in another video track in order from 10-0, but found that i had to speed these up as they went over a second in length. I used the speed property to change each image to a second and after playing with the percentages, found that 600% would make each image 1 second in length.

I then grouped them together to make it easier to move if i had to etc etc


Creating the Clock.

I thought this would have been pretty simple to do... how wrong was I!!!!


TO create the clock, i found a video on youtube detailing how to create the clock effect and add it into adobe premiere. It looked simple enough until i saw a part saying create a different PSD file on photoshop for each second.Luckily i only had to do 10 seconds, so it wasn't as bad as first thought.

I downloaded an LCD clock font and added it to Windows fonts, so that i could use it in photoshop.

In photoshop, i created 2 layers, and on the first layer put a black rectangle, where the clock would go, so that you could see the clock over the videos in the final thing.

I then added a text box with the following: 00:00:10, as the clock was to count down from ten. I needed to change the colour from black to a gold yellow so did this and then saved the file as 10.psd, so that i could then add it into premiere.

I did the same for each number from 00:00:10 to 00:00:00, and saved each one as a #.psd, where # is the number used on the image itself.

Creating the split screen effect.

After importing both of the videos into adobe premiere Pro, i can now work on getting the split screen effect done.

This was pretty simple as all i did was to copy each video onto a different timeline like in the image below:


I then had to resize and position the videos using the clip effect in Premiere. I ended up with each video being place in the correct place at the correct time.

I now had to create the timelapse effect by speeding up the video, so that i could get 30 minutes of video into 10 seconds. To do this i right clicked on the video on the timeline, and clicked the speed property. I played around with different percentages, and found that i had to speed up the video by a phenomenal 9,500%!!!.


It worked!, i now had the basis for my video and it was 10.12 seconds long, which is still ten seconds, so all i needed to do now was add the 24 clock into it, and add the title and the clock tick sound also used in "24"...

Ripping the Video to computer

Luckily , my computer has a firewire port at the back embedded within the motherboard, and i also got a cable with the motherboard when i bought it new last month, so ripping to the computer would be no problem.


it took me an hour to rip both the videos to the computer, i didnt realise that they would end up being 5GB each!!! just for half an hour film!.

obviously i would have to do some edititing so that end video doesnt end up being 10GB+!!!!

Recording the Video

I decided to do the videoing back at home over christmas, and to get it all done over christmas.

My 2 videos were going to be shot from my bedroom looking outside at the top of the houses, mainly at the sky.

The video recording was a success, and managed to get 2 videos each of 30 minutes worth of video of the sky changing from light to dark and vice versa.

Now to rip to the computer...

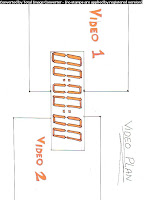
Video Plan

My Plan for this video was to simply draw out what i wanted the video to look like on screen, and see if i could match this with the real thing.

Here is a scan of the plan that i drew out:-


ASSIGNMENT 2- VIDEO PROJECT, Initial Ideas

After getting my results for the photo project- which overall was a 2:1 (well chuffed!), I decided to think about the video work.

Our Brief was to create a short 10 second film that was to be shown in front of the lecture audience/workshop.

Initial thoughts were actually bland, i had no idea what to do for a week or so, but then i had the idea to imitate the effects on the Series "24", where they have 4 videos splitscreened onto one screen, with the clock in the centre counting down.

After some consideration, it was decided that this was not viable, but i wanted to do the 24 theme still.

Another week passed before i had any other idea, but the idea that came up was a good'n.

I decided to still do the 24 clock theme, but to have just the two videos, one either side and off centre.
The videos were to be of the view outside of my front window, when it is dark turning to light in the morning, and when it is light turning to dark in the evening, so i could then improve my video by doing a timelapse. This should enable me to get good marks as it is 2 different videos, which are then timelapsed.